So recently, I had a Moto E13 (model XT2345-2) land on my desk, totally stuck on the Google verification screen after a reset. It was running Android 13 with the latest May 2025 security patch. Normally, this would mean trouble — especially on a Spreadtrum (SPD) processor.

But guess what? I managed to bypass FRP without using any software tools, no flashing, no risky methods. Just the phone in my hand and a little trick I discovered. And yes, it worked perfectly — without bricking the device or even touching a computer.
Let me walk you through exactly what I did, step by step.
🤔 First, What’s the FRP Headache?
If you’re reading this, you probably already know. But just in case: Factory Reset Protection is a feature built into Android to protect your phone if it gets stolen or lost. Once the phone is reset, it asks for the last Google account used. If you don’t have it, you’re locked out — simple as that.
Sounds good on paper, but when you forget your own credentials or buy a second-hand phone, it becomes a huge pain. That’s exactly what happened in my case.
Also – MCT OFP Extractor Tool_GSMYOGESH
📱 The Trick That Saved Me (No Tools, No PC, No Stress)
Here’s what I did — super simple, no downloads, no tricks that break your phone:
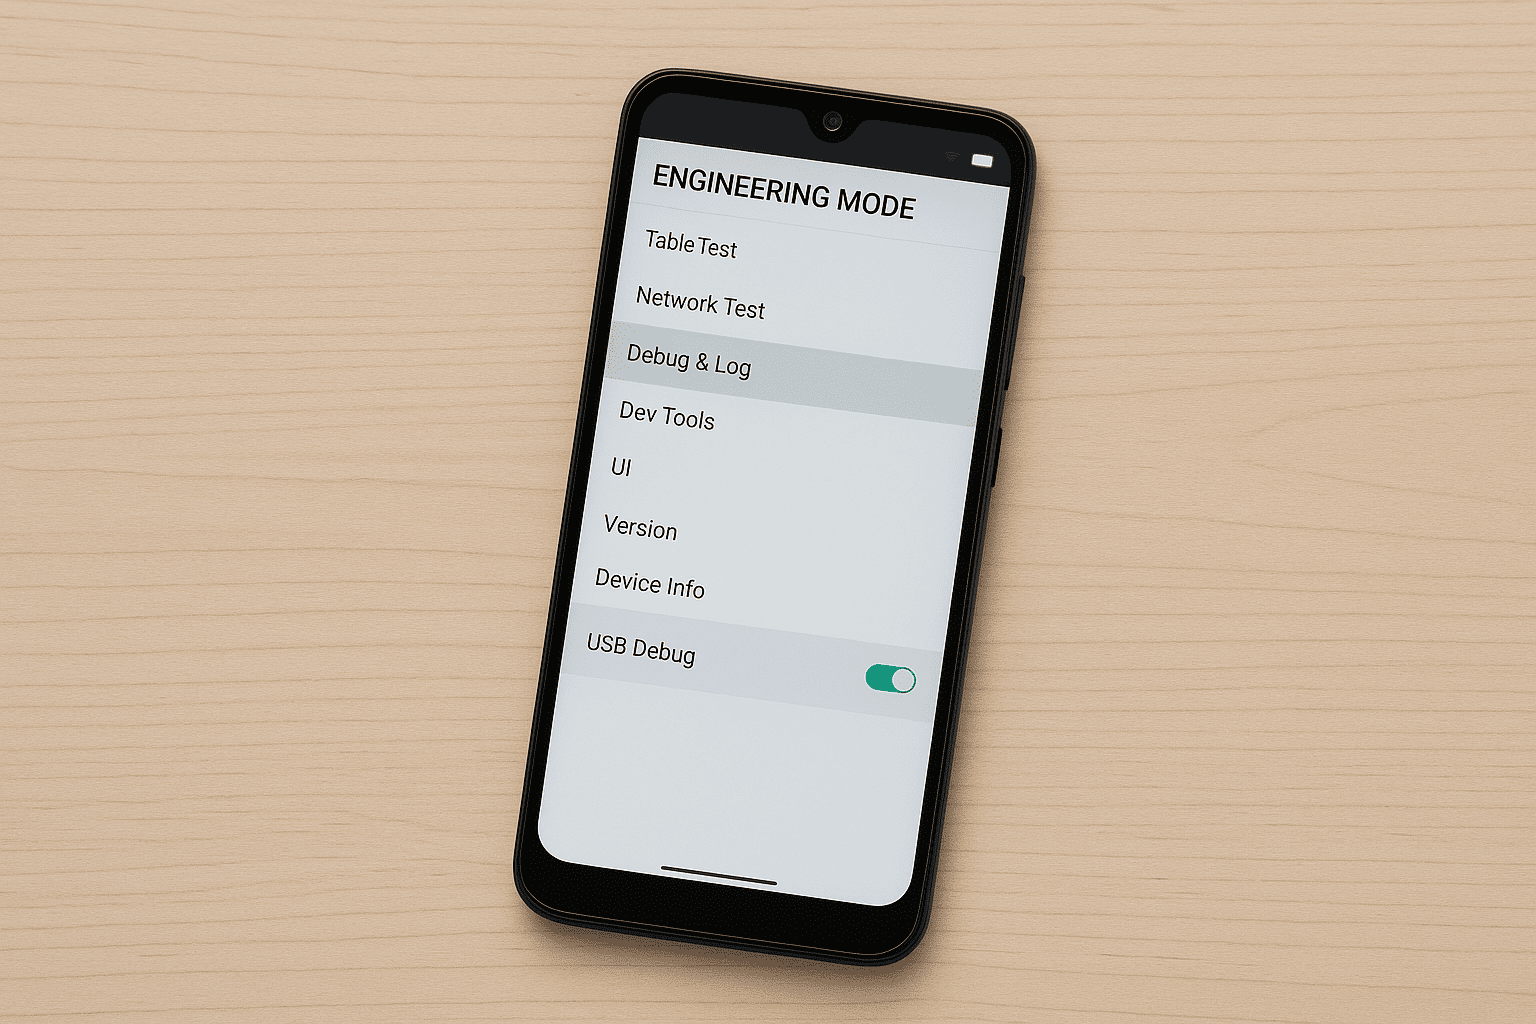
🔓 Step-by-step FRP Bypass for Motorola SPD Phones
- Connect the phone to Wi-Fi and wait until you reach the screen that asks for the Google account.
- Tap on Emergency Call at the bottom.
- In the dialer, type this code:
*#*#83781#*#* - Boom! You’ll be taken into Engineering Mode. Yes, it opens even when FRP is active. Wild, right?
- Scroll and find the section called DEBUG & LOG.
- Now just turn on “USB Debug” from there.
- That’s it. You’re in. The phone is now ready to accept ADB commands or simple FRP bypass techniques.
🧪 My Test Device
- Model: Moto E13 (XT2345-2)
- Chipset: Spreadtrum (SPD)
- Android Version: 13
- Security Patch: May 2025
- Result: Unlocked without any PC tool or data loss
⚡ Why This Works (And Why It’s Safer Than Tools)
Most FRP methods floating around need custom tools, patched firmware, or even paid services. I’m not a fan of those because they can mess up partitions or kill the phone if you do it wrong.
But this method? It just uses a built-in engineering menu that the system doesn’t lock out — even with FRP on. It’s like finding a hidden backdoor that was always there.
And since you’re not flashing anything or modifying the firmware, there’s zero risk of bricking your device.
🛠️ What Can You Do After Enabling USB Debug?
Once USB Debug is on, you can use basic ADB commands (with a PC) like:
adb shell am start -n com.google.android.gsf.login/
adb shell pm clear com.google.android.gsf.login
https://developer.android.com/tools/releases/platform-tools#downloads
Or simply use any free ADB-based FRP remover — no more locked screen.
🧍 Real-Life Tip
I’ve tried this on one device so far — but if you’ve got another Motorola with an SPD processor, there’s a good chance it’ll work. I recommend trying it before even touching any flash tool or paid solution.
✅ Final Words
I know how stressful it can be to get locked out of your phone, especially when nothing seems to work. This trick saved me time, money, and frustration. And I hope it does the same for you.
Let me know if it works for your device — drop your model and Android version in the comments or message me. I’d love to hear if this helps more people!